draw a tree diagram in latex
Trees as a data visualization tool
Tree diagrams are used to represent hierarchical information, which means there is a root and all the other information in the data can be shown in relation to that root. It is like the root is the base of our tree and all other information are its branches and leafs (nodes).
All trees consist of nodes and branches. Nodes hold the data and branches represent the connections between nodes. Tree structures usually have a node that has no parents—it is called the root node. All other nodes have a parent node, which is a node one step higher in the hierarchy. When there is a directly connected one step lower node, it is called a child node. And nodes that share the same parent are called sibling nodes.
Trees can be used to show the members of a family, data structures, outlines, evolutionary relationships, organizational structures, playoff brackets, and many more types of data.
Drawing Trees in TikZ
To get started, we create our drawing environment. We load TikZ package and enter into a tikzpicture environment.
\documentclass[border=0.2cm]{standalone} \usepackage{tikz} \begin{document} \begin{tikzpicture} % We will draw here \end{tikzpicture} \end{document} We can easily start drawing our tree using by starting a node, with \node command. We need to provide its content in curly parentheses. To create child nodes, we can use child {} command as we continue in the node. All the nested children should go in the parentheses. Content for the children can be declared as new nodes, notice that this time we don't need the backslash in the syntax. Let's start a tree with two levels using these commands. We will name the nodes as parent, child 1 and child 2.
\documentclass[border=0.2cm]{standalone} \usepackage{tikz} \begin{document} \begin{tikzpicture} \node {parent} child {node {child 1}} child {node {child 2}}; \end{tikzpicture} \end{document} 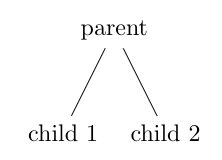
As you can see, starting a tree is really easy. child command includes both the node that we wrote, and the branch that comes as default with the code. We can see where the child element starts by changing its style. In the following code, we changed the color of the first child and the node of second child using red option.
\documentclass[border=0.2cm]{standalone} \usepackage{tikz} \begin{document} \begin{tikzpicture} \node {parent} child [red] {node {child 1}} child {node [red] {child 2}}; \end{tikzpicture} \end{document} 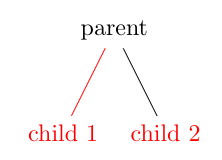
We also have the option to change the style of only the branch. When we use the child element, even if we don't type it, it automatically sets the branch using edge from parent command. We can change the branch style by typing the command after the child node, and we can even write on a branch by adding another node. In the following code, we changes one branch to have dashed and double lines, and the other to be blue and have a brown label at its right.
\documentclass[border=0.2cm]{standalone} \usepackage{tikz} \begin{document} \begin{tikzpicture} \node {parent} child [red] {node {child 1} edge from parent [dashed]} child {node [red] {child 2} edge from parent [blue] node [right, brown] {x}}; \end{tikzpicture} \end{document} 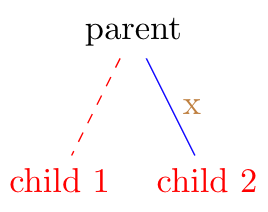
In some cases we may want to grow our tree to other directions. We can achieve this by using grow styling option. It can take parameters such as left, up, down, south west, north east, or angles like 30, 270, and grows the tree through given direction. Let's see different examples:
\documentclass[border=0.2cm]{standalone} \usepackage{tikz} \begin{document} \begin{tikzpicture} \node {parent} [grow = up] child [red] {node {child 1} edge from parent [dashed]} child {node [red] {child 2} edge from parent [blue] node [right, brown] {x}}; \node at (2,0) {o} [grow = north east] child {[fill] circle (2pt)} child {[fill] circle (2pt)}; \node at (4,0) {x} [grow = 300] child {node {a}} child {node {b}}; \end{tikzpicture} \end{document} 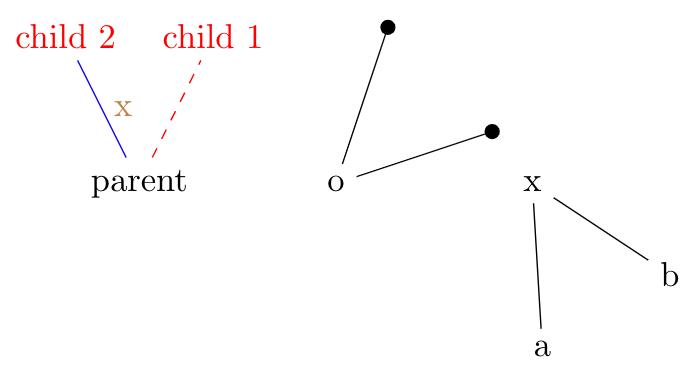
Notice that in the middle we have different kind of nodes. We can have anything we like as our child nodes, in this example we decided to put little filled-in circles using [fill] circle (2pt) command. Let's add another level to our tree by adding more child commands inside our child contents. (We will add the children before edge from parent option of the parent node.)
\documentclass[border=0.2cm]{standalone} \usepackage{tikz} \begin{document} \begin{tikzpicture} \node {parent} child [red] {node {child 1} edge from parent [dashed]} child {node [red] {child 2} child {node {grandchild 1}} child {node {grandchild 2}} edge from parent [blue] node [right, brown] {x}}; \end{tikzpicture} \end{document} 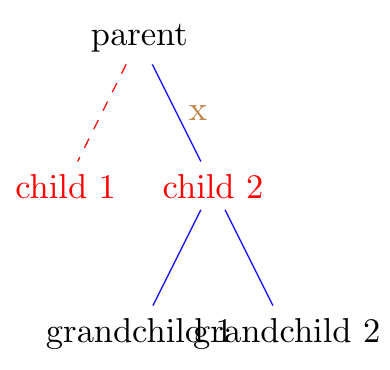
You can see that the style options of our parent node's branch are inherited to its child nodes. But we have a different problem here, second level nodes' contents are overlapped. We can avoid this by setting a text width limit to our nodes. Another option is to set a sibling distance, which is the distance between nodes in the same level. Following code implements a sibling distance of 2.5 cm for our tree.
\documentclass[border=0.2cm]{standalone} \usepackage{tikz} \begin{document} \begin{tikzpicture} \node {parent} [sibling distance = 2.5cm] child [red] {node {child 1} edge from parent [dashed]} child {node [red] {child 2} child {node {grandchild 1}} child {node {grandchild 2}} edge from parent [blue] node [right, brown] {x}}; \end{tikzpicture} \end{document} 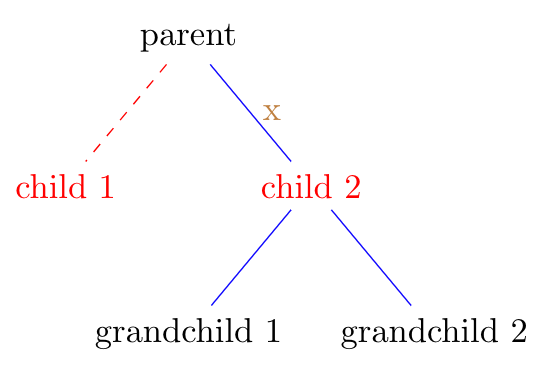
We also have the option to shift the individual positions of the nodes. We can use xshift and yshift commands as a styling option to the nodes for them to shift. To show their effect, following code shifts first grandchild 1cm to left and second 0.5cm to up.
\documentclass[border=0.2cm]{standalone} \usepackage{tikz} \begin{document} \begin{tikzpicture} \node {parent} [sibling distance = 2.5cm] child [red] {node {child 1} edge from parent [dashed]} child {node [red] {child 2} child {node [xshift = -1cm] {grandchild 1}} child {node [yshift = .5cm] {grandchild 2}} edge from parent [blue] node [right, brown] {x}}; \end{tikzpicture} \end{document} 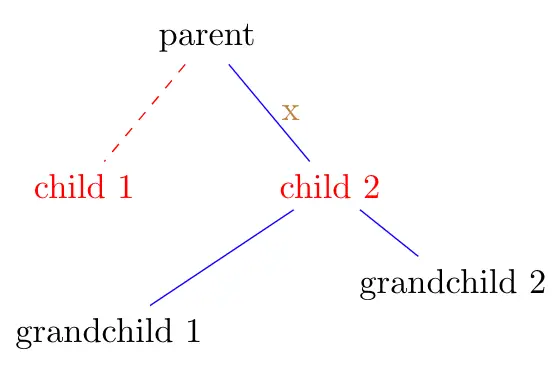
In some cases we might need longer distance between our levels. We can deal with it using level distance command. Let's shorten our distance to see the commands' effects.
\documentclass[border=0.2cm]{standalone} \usepackage{tikz} \begin{document} \begin{tikzpicture} \node {parent} [sibling distance = 2.5cm, level distance = 1cm] child [red] {node {child 1} edge from parent [dashed]} child {node [red] {child 2} child {node {grandchild 1}} child {node {grandchild 2}} edge from parent [blue] node [right, brown] {x}}; \end{tikzpicture} \end{document} 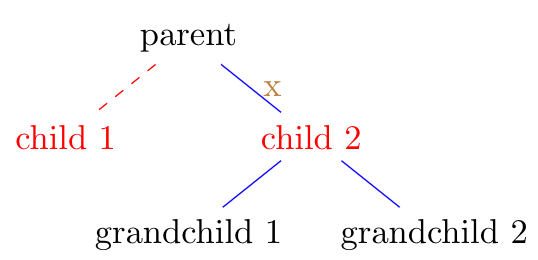
In trees with lots of nodes, we might need to have separate settings for each level. We probably need more sibling distance in a level with nodes that has long texts ,and we will need it shorter in another level with lots of nodes to fit. We can use our styling options after the parent node to effect all of its child nodes. To see how it works, we will add some child nodes to 'child 1' node and change our placement of the options.
\documentclass[border=0.2cm]{standalone} \usepackage{tikz} \begin{document} \begin{tikzpicture} \node {parent} child [red] {node {child 1} [sibling distance = 2.5cm, level distance = 1cm] child {[fill] circle (2pt)} child {[fill] circle (2pt)} edge from parent [dashed]} child {node [red] {child 2} child {node {grandchild 1}} child {node {grandchild 2}} edge from parent [blue] node [right, brown] {x}}; \end{tikzpicture} \end{document} 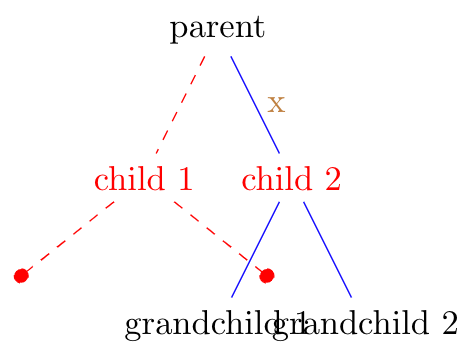
In the example, we were able to change the styling for one parent and its children, but to make it effective for each node on that level we need to repeat the options, whereas we are trying to avoid repetition. TikZ gives us the option to style different levels of our trees. Level 1 nodes are children of our root concept, level 2 nodes are children of the level 1 nodes, and so on. We can alter styling options such as color, level distance or sibling distance for each sibling node in level 1 by using level 1/.style as a parameter to our tikzpicture environment. Following code shows different options in practice with one new level. We also removed other coloring options to show our new styling's effects.
\documentclass[border=0.2cm]{standalone} \usepackage{tikz} \begin{document} \begin{tikzpicture} [ level 1/.style = {red, sibling distance = 4cm}, level 2/.style = {blue, sibling distance = 2.5cm} ] \node {parent} child {node {child 1} child {[fill] circle (2pt)} child {[fill] circle (2pt)} edge from parent [dashed]} child {node {child 2} child {node {grandchild 1} child {node {great-grandchild}}} child {node {grandchild 2}} edge from parent node [right] {x}}; \end{tikzpicture} \end{document} 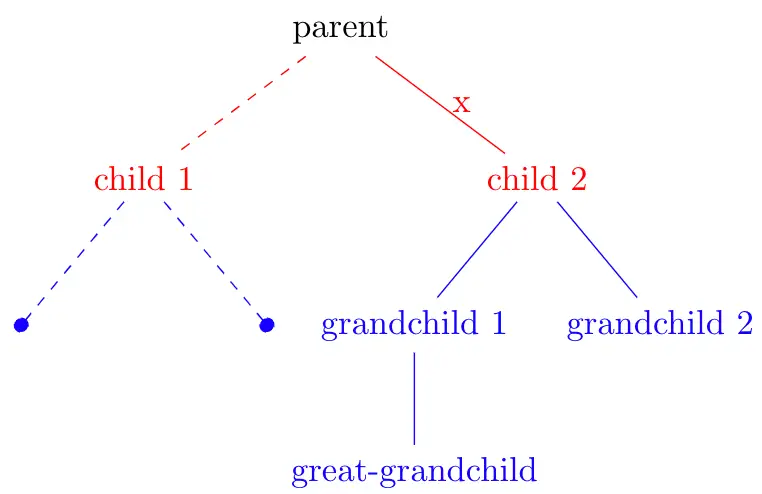
As you can see in the image, level 2 has a different sibling distance and color than its upper level, but level 3 have the same color with level 2. We didn't declare a styling for our new level 3, and it assumed that it has the same styling as its upper level. The system works by inheriting upper level's options.
In some cases we may want to have an empty space for our nodes without losing the sibling distance for that empty space. We have use missing option with our child nodes for these situations. In following example, you can see that, even though we only have one child node for 'child 1', it is not a straight down line like we have between 'grandchild 1' and 'great-grandchild'. It is because we didn't lose distance settings when we use the missing option for the first child node of 'child 1'.
\documentclass[border=0.2cm]{standalone} \usepackage{tikz} \begin{document} \begin{tikzpicture} [ level 1/.style = {red, sibling distance = 4cm}, level 2/.style = {blue, sibling distance = 2.5cm} ] \node {parent} child {node {child 1} child [missing] {[fill] circle (2pt)} child {[fill] circle (2pt)} edge from parent [dashed]} child {node {child 2} child {node {grandchild 1} child {node {great-grandchild}}} child {node {grandchild 2}} edge from parent node [right] {x}}; \end{tikzpicture} \end{document} 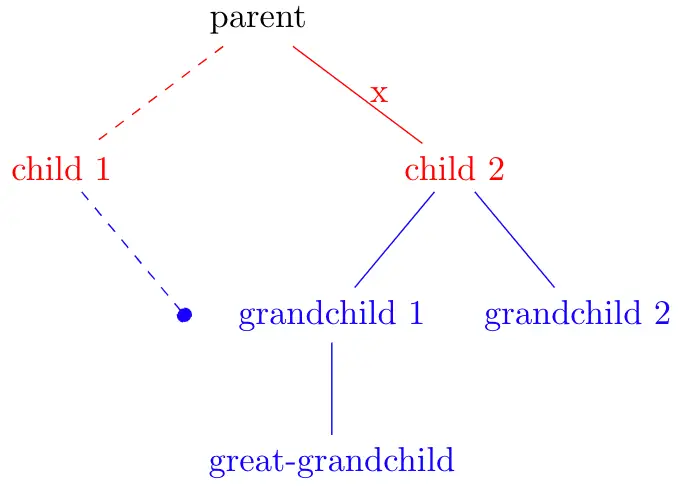
When our trees grow, TikZ places our nodes by taking their center as the anchor point, which means that our distance setting options are calculated for the center coordinates for each node. We can change that with two options; to change the starting end of our branch we can use growth parent anchor option for our root or children, and to change the finishing end of our branch we can use only anchor option. For example, in a scenario where we have one parent and one child node, if the level distance is 1 cm, our child node will be placed one centimeter below the anchor of the parent node. If we set our growth parent anchor to east and the anchor for our child node to west, the distance between parent node's center right point and child node's center left point will be 1 cm. Following code shows these commands in our level 3 node. We set the level distance to 1 cm for level 3, draw a border for our nodes, and lay a grid to help conceive the distances.
\documentclass[border=0.2cm]{standalone} \usepackage{tikz} \begin{document} \begin{tikzpicture} [ level 1/.style = {red, sibling distance = 4cm}, level 2/.style = {blue, sibling distance = 2.5cm}, level 3/.style = {teal, level distance = 1cm} ] \draw[help lines] (-1, -2) grid (5,-5); \node {parent} child {node {child 1} child {[fill] circle (2pt)} child {[fill] circle (2pt)} edge from parent [dashed]} child {node {child 2} child [growth parent anchor = east] {node [draw] {grandchild 1} child [anchor = west] {node [draw] {great-grandchild}}} child {node {grandchild 2}} edge from parent node [right] {x}}; \end{tikzpicture} \end{document} 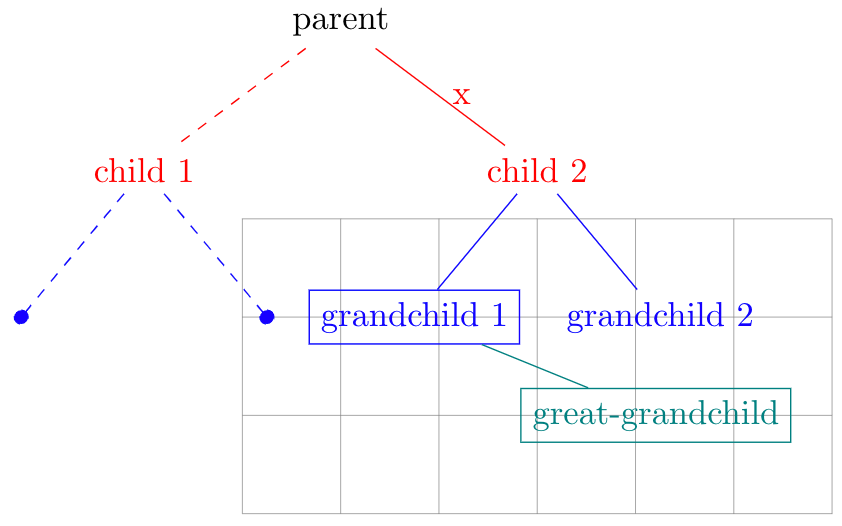
We were able to change the position of our nodes, but we didn't change the positioning of where our branch starts and ends. We can change it by using parent anchor and child anchor commands. These commands change the branch of the child, so for example, if we want to have the branch between 'grandchild 1' and 'great-grandchild' to start from the lower right end of the parent node and end at the upper left end of the child node, we must give parent anchor = south east and child node = north west options to the child command of 'great-grandchild' node. Below you can see these changes:
\documentclass[border=0.2cm]{standalone} \usepackage{tikz} \begin{document} \begin{tikzpicture} [ level 1/.style = {red, sibling distance = 4cm}, level 2/.style = {blue, sibling distance = 2.5cm}, level 3/.style = {teal, level distance = 1cm} ] \node {parent} child {node {child 1} child {[fill] circle (2pt)} child {[fill] circle (2pt)} edge from parent [dashed]} child {node {child 2} child [growth parent anchor = east] {node [draw] {grandchild 1} child [anchor = west, parent anchor = south east, child anchor = north west] {node [draw] {great-grandchild}}} child {node {grandchild 2}} edge from parent node [right] {x}}; \end{tikzpicture} \end{document} 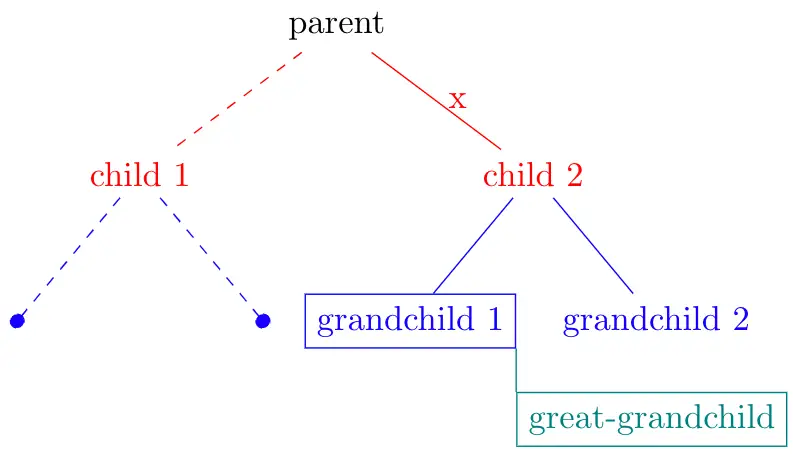
We can also change the look of our branches by using edge from parent path option on our parent node or tikzpicture environment. By default, the command has the parameter: (\tikzparentnode\tikzparentanchor) -- (\tikzchildnode\tikzchildanchor). So it is defining a line from the parent node's anchor to child node's anchor. We can change these parts to have a branch path for our needs. One cool thing to try is to have curly branches, which we can achieve using controls option of TikZ. Instead of the line --, we will use .. controls +(0,-1) and +(0,1) .., which is a different piece of syntax but all it does is to create a curve towards 1 cm below and then 1 cm right of the previous diagonal line. We can see these effects in following code. (We also changed the syntax for our filled in circle nodes. Using previous syntax would also fill the spaces of our curved lines. We swapped them with node [circle, fill, minimum size = 4pt, inner sep = 0] {} command, basically creates the same node without effecting the branch.)
\documentclass[border=0.2cm]{standalone} \usepackage{tikz} \begin{document} \begin{tikzpicture} [ level 1/.style = {red, sibling distance = 4cm}, level 2/.style = {blue, sibling distance = 2.5cm}, level 3/.style = {teal, level distance = 1cm}, edge from parent path = {(\tikzparentnode\tikzparentanchor) .. controls +(0,-1) and +(0,1) .. (\tikzchildnode\tikzchildanchor)} ] \node {parent} child {node {child 1} child {node [circle, fill, minimum size = 4pt, inner sep = 0] {}} child {node [circle, fill, minimum size = 4pt, inner sep = 0] {}} edge from parent [dashed]} child {node {child 2} child [growth parent anchor = east] {node [draw] {grandchild 1} child [anchor = west, parent anchor = south east, child anchor = north west] {node [draw] {great-grandchild}}} child {node {grandchild 2}} edge from parent node [right] {x}}; \end{tikzpicture} \end{document} 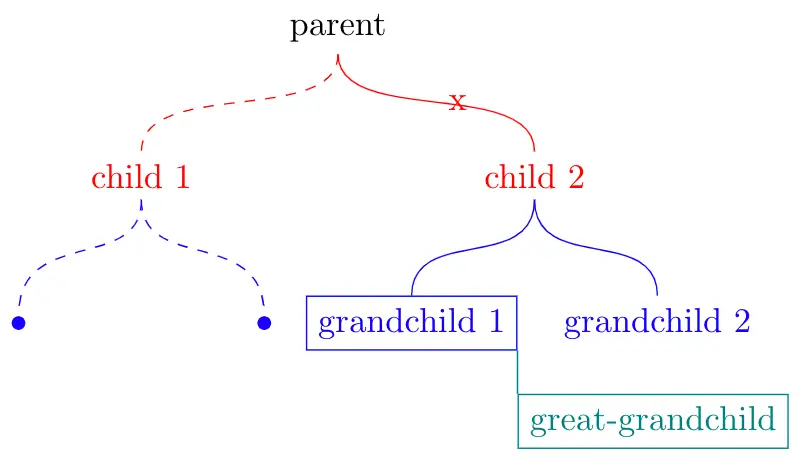
Until now, we only used native TikZ commands. However there is a tree library we can use to have additional options on styling our branches and positioning our child nodes. To include it we need to add \usetikzlibrary{trees} command before starting our document. One of the options that come with the library is to have forked style branches. These branches are usually used for family trees or to emphasise the level of the nodes. We can implement it to our code using edge from parent fork down option. (If we are growing our tree to up, right or left, we can still use the command by changing the last word to the equivalent direction.)
\documentclass[border=0.2cm]{standalone} \usepackage{tikz} \usetikzlibrary{trees} \begin{document} \begin{tikzpicture} [ level 1/.style = {red, sibling distance = 4cm}, level 2/.style = {blue, sibling distance = 2.5cm}, level 3/.style = {teal, level distance = 1cm}, edge from parent fork down ] \node {parent} child {node {child 1} child {node [circle, fill, minimum size = 4pt, inner sep = 0] {}} child {node [circle, fill, minimum size = 4pt, inner sep = 0] {}} edge from parent [dashed]} child {node {child 2} child [growth parent anchor = east] {node [draw] {grandchild 1} child [anchor = west, parent anchor = south east, child anchor = north west] {node [draw] {great-grandchild}}} child {node {grandchild 2}} edge from parent node [right] {x}}; \end{tikzpicture} \end{document} 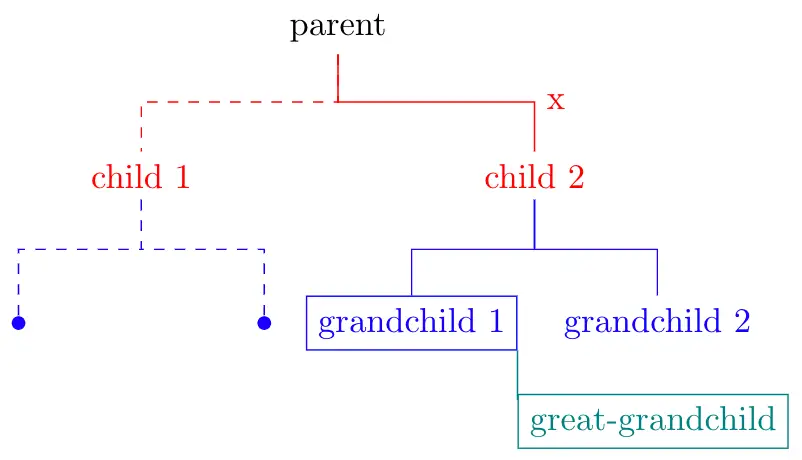
Another cool option we have to grow our three in a cyclical way, using grow cyclic command. This command can be better used by adding sibling angle options instead of sibling distance. We can also declare where to draw the first node and to what direction it will draws the next node by using clockwise from or counterclockwise from options. These options takes angles as parameter, add to the angle value inherited from the previous level. In our example, we will have 90degrees between our first level nodes and 60degrees between the second level and third level nodes. We also added the option to place the first child of 'child 1' node 90degrees away counterclockwise from the previous angle. (Notice the perpendicular branches at the sides of 'child 1' node.) The second child will continue at 60degrees clockwise.
\documentclass[border=0.2cm]{standalone} \usepackage{tikz} \usetikzlibrary{trees} \begin{document} \begin{tikzpicture} [ level 1/.style = {red, level distance = 2.5cm, sibling angle = 90}, level 2/.style = {blue, sibling angle = 60}, level 3/.style = {teal}, grow cyclic ] \node {parent} child {node {child 1} [clockwise from = 90] child {node [circle, fill, minimum size = 4pt, inner sep = 0] {}} child {node [circle, fill, minimum size = 4pt, inner sep = 0] {}} edge from parent [dashed]} child {node {child 2} child {node {grandchild 1} child {node {great-grandchild}}} child {node {grandchild 2}} edge from parent node [right] {x}}; \end{tikzpicture} \end{document} 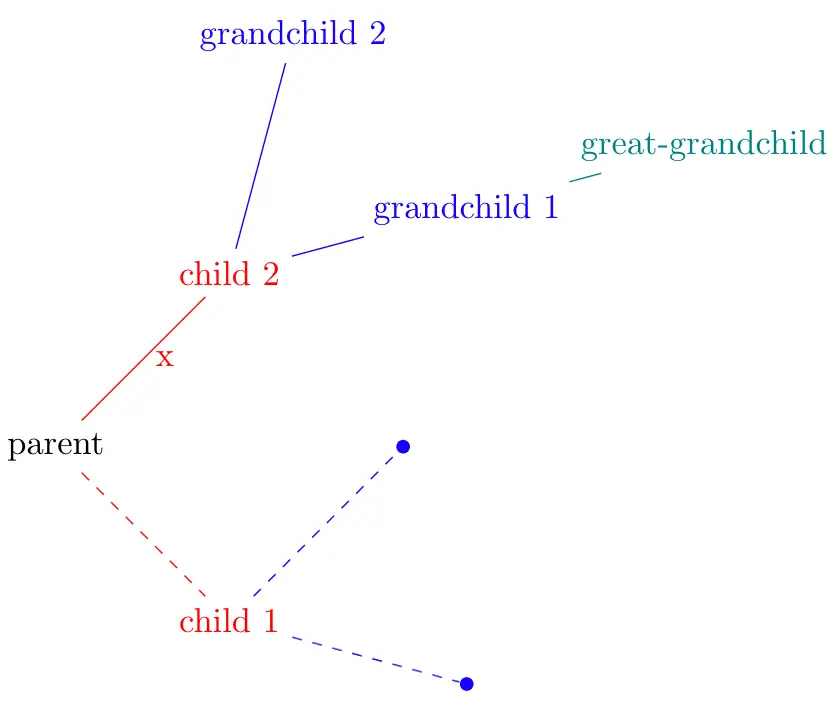
Last option we will cover is a powerful but a bit complicated. We can place our nodes using grow via three points = one child at (x) and two children at (y) and (z) option. This option places our nodes using a growth function:
- If a parent node has one child, this node will be placed at position x.
- If the parent node has two children, they will be placed at positions y and z.
- If the parent had more than two children, all the nodes will be placed according to an equation:

where n is the total number of children and c is the number of the current child, starting with 1.
It is a great option when you have a particular arrangement in mind and you can express it as a linear equation. Let's create a tree using this new option to see its effects.
For our example, we want to create an outline tree, which can be used for document outlines, nested elements, etc. We will create this look using anchor option for our nodes, changing the way we draw our branches, and growing our three in a particular way. In outlines, the branches usually go into the node from its left side. To achieve this, we need to add anchor = west to every node in the three. We can easily do this using every node/.append style option for our tikzpicture. We will also draw the borders of our nodes to better show the anchors. (To not draw a border to our branch node 'x', we will use draw = none option for only that node. Also, due to our new direction, we will place the node to left of the branch.)
Next, we need to place our nodes in a particular way. Let's say that the first child node will be placed 0.8 cm below and 0.5 cm right of its parent, and every child node after that will be placed 0.8 below of the first child. So the first position will be (.5,-.8) and, the second will be (.5,-1.6). We can use the first position for x and y parameters and the second position for z parameter of grow via three points option. To create the space needed for upper children, we can use missing nodes. Finally, to draw the branches parallel to x and y axes instead of as diagonal lines, we can change our drawing line of edge from parent path option to |- . Following code implements these changes.
\documentclass[border=0.2cm]{standalone} \usepackage{tikz} \usetikzlibrary{trees} \begin{document} \begin{tikzpicture} [ level 1/.style = {red}, level 2/.style = {blue}, level 3/.style = {teal}, every node/.append style = {draw, anchor = west}, grow via three points={one child at (0.5,-0.8) and two children at (0.5,-0.8) and (0.5,-1.6)}, edge from parent path={(\tikzparentnode\tikzparentanchor) |- (\tikzchildnode\tikzchildanchor)}] \node {parent} child {node {child 1} child {node [circle, fill, minimum size = 4pt, inner sep = 0] {}} child {node [circle, fill, minimum size = 4pt, inner sep = 0] {}} edge from parent [dashed]} child [missing] {} child [missing] {} child {node {child 2} child {node {grandchild 1} child {node {great-grandchild}}} child [missing] {} child {node {grandchild 2}} edge from parent node [draw = none, left] {x}}; \end{tikzpicture} \end{document} 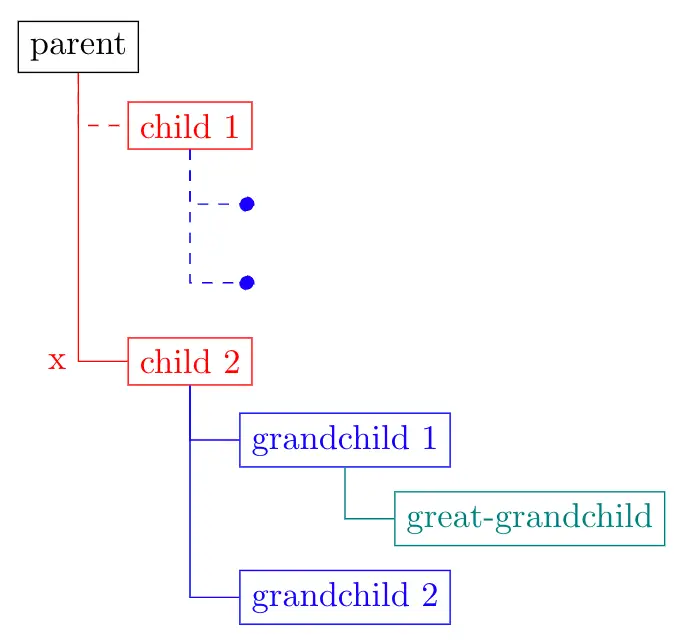
This concludes our trees tutorial.
heinrichcarbandoin.blogspot.com
Source: https://latexdraw.com/draw-trees-in-tikz/
0 Response to "draw a tree diagram in latex"
Post a Comment